Water in your basement threatens your foundation, indoor air quality, and long-term maintenance costs — so you need a reliable way to stop it at the source. Exterior basement waterproofing creates a barrier and drainage path outside the foundation, preventing water from ever reaching your walls and footing.
This article walks you through how exterior waterproofing works, what methods pros use, and how to decide whether a full exterior approach fits your home and budget. You’ll learn practical signs to watch for, the common techniques installers apply, and the trade-offs between DIY fixes and hiring a contractor.
Expect clear, actionable guidance that helps you assess risk, prioritize repairs, and choose the right solution to keep your basement dry and your foundation sound.
Understanding Exterior Basement Waterproofing
Exterior basement waterproofing stops water before it reaches your foundation, reduces hydrostatic pressure, and routes groundwater away from your home. You’ll learn what the method involves, why it often outperforms interior fixes, what lets water in, and the signs that say it’s time to act.
What Is Exterior Basement Waterproofing
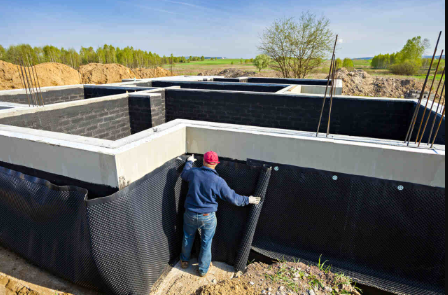
Exterior waterproofing creates a barrier on the outside of your foundation to prevent groundwater from contacting the wall. Typical steps include excavating around the foundation, repairing cracks, applying a membrane or liquid-applied barrier, and reinstalling engineered drainage such as a perimeter drain or weeping tile.
Materials vary by soil and climate: rubberized asphalt membranes, bentonite clay panels, and polyurethane coatings are common. You’ll often combine a membrane with a gravel drainage layer and a drain pipe that leads to a sump or daylight discharge. Proper backfill and grading complete the system to keep surface water flowing away.
Benefits of Exterior Waterproofing Methods
Exterior methods prevent water entry rather than managing water once it’s inside, which reduces mold risk and preserves interior finishes. You’ll avoid recurring interior patchwork, and you protect the foundation’s structural concrete from long-term moisture damage.
Exterior systems also lower hydrostatic pressure by intercepting water at the soil level and routing it to drains. That reduces the likelihood of leaks through hairline cracks and minimizes reliance on sump pumps. In many climates, exterior waterproofing increases resale value by addressing root causes, not just symptoms.
Common Causes of Basement Water Infiltration
Water gets into basements mainly from three sources: surface runoff, groundwater, and plumbing failures. Poor exterior grading or clogged gutters send roof runoff toward the foundation, increasing saturation at the wall base.
High groundwater table and heavy clay soils hold water near the foundation, increasing hydrostatic pressure. Cracks from settlement, unsealed construction joints, or deteriorated foundation materials provide paths for moisture. Finally, failed seals around utility penetrations and broken underground pipes can cause concentrated leaks you can trace and repair.
Signs Your Basement Needs Waterproofing
Look for standing water, persistent damp spots on walls or floors, and recurring musty odors indicating ongoing moisture. Horizontal or stair-step cracks in masonry, efflorescence (white mineral deposits), and peeling paint also point to water migration through the wall.
Other indicators include a high humidity level in the basement, visible mold growth, and a sump pump that runs frequently after moderate rain. If you notice water tracking down a wall or dampness only during heavy storms, exterior issues such as poor grading or failing exterior drainage are likely causes.
See also: Residential Building Inspector: Why Professional Home Inspections Matter
Key Methods for Exterior Basement Waterproofing
You need systems that stop water at the source, move it away from the foundation, and repair weak or damaged wall sections. The methods below explain materials, installation priorities, and what to inspect after work is done.
Waterproof Membranes and Coatings
Choose a continuous, exterior-applied membrane to block water before it reaches the concrete or masonry. Common options include self-adhering rubberized asphalt sheets and liquid-applied polymer coatings; sheets offer predictable thickness and puncture resistance, while liquid coatings seal irregular surfaces and penetrations.
Proper installation matters more than brand. Remove soil to expose foundation walls, clean and repair cracks, apply a primer if required, and overlap or feather membrane edges per manufacturer instructions. Extend the membrane from just below grade down to the footing line, and protect it with a drainage board or board insulation to prevent damage during backfill.
Inspect seams, transitions around pipes, and the membrane at the footing level. Any gaps, blisters, or loose edges reduce effectiveness and allow hydrostatic pressure to push water through weak points.
Exterior Drainage Systems
Exterior drainage redirects groundwater away from the foundation and relieves hydrostatic pressure. The typical system uses a perforated drain (weeping tile) placed at the footing level, wrapped in filter fabric, and connected to a gravity outlet or sump pump discharge line.
Install the drain in a 2–4 inch gravel trench directly adjacent to the footing, keeping the pipe slope at least 1% (1/8 inch per foot) toward the outlet. Use rigid PVC or corrugated pipe rated for buried installation; avoid exposed joints at the footing level. Where gravity discharge isn’t possible, route to a buried sump pit with a submersible pump and a monitored float switch.
Combine the drain with a membrane and backfill with clean free-draining material. Test the system by running water near the foundation and confirming flow at the outlet or sump pit.
Foundation Wall Repairs
Address structural and moisture-entry points before covering the foundation. Common repairs include epoxy or polyurethane crack injections, replacing deteriorated mortar or block units, and installing steel reinforcement for bowed walls.
Evaluate cracks for movement: non-moving hairline cracks often take a simple sealant or injection, while horizontal or stepped cracks in block require structural repair. For masonry, tuckpoint damaged mortar and replace spalled bricks or blocks. If walls bow or lean, consult a structural specialist about plate anchors, helical tiebacks, or carbon-fiber reinforcement.
Document repairs with photos and notes. Properly executed repairs restore structural integrity and ensure the waterproofing membrane adheres to a sound surface.
Proper Grading and Landscaping
Control surface water to reduce load on exterior systems. Grade soil to slope away from the foundation at a minimum of 5% for the first 10 feet (roughly 6 inches of drop over 10 feet) and maintain that slope with stable, compacted fill.
Use impermeable hardscapes and gutters strategically: keep downspouts extended at least 6 feet from the foundation or tied into the drainage system. Avoid planting large trees or shrubs close to the wall; root growth can disrupt membranes and drain lines. Place mulch beds and planting soils lower than finished grade only if you add a protective membrane and a root barrier.
Inspect grading after heavy rains and recompact or add soil where erosion or settling reduces slope. Regular maintenance preserves the performance of your waterproofing system.